Once you have logged in to the TourBuilder Go app and selected the property where you are shooting the virtual tour, you're ready to begin. Prior to shooting your virtual tour, we recommend you take a couple of minutes to complete a walkthrough of the area and prep the space.
 Step 1: Capture a 360 Scene
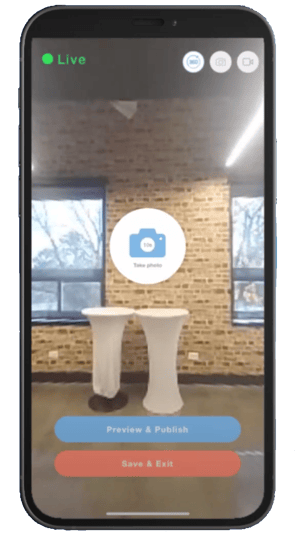
When you are ready to capture a 360 scene, press the "Take Photo" button on the phone screen. You must leave the room during the 360 capture. Once you tap "Take Photo," a default five-second timer will display on the screen to allow enough time to leave the room or area. The timer can be adjusted in the TourBuilder App Settings or by holding down the “Take photo” button.
Step 2: Approve Your Scene
After you capture your scene, swipe the room selector up to view the entire 360 panorama. If you are satisfied with the photo, select the type of room where the scene was taken and tap the "Looks Good" button, otherwise select "Retake."
Step 3: Walk Tripod to Next Capture-Point
Once you've approved the 360 scene, walk the tripod to the next location in your virtual tour and repeat steps one and two.
When moving to the next capture point, remember:
- Line-of-sight - Your next capture point should have a clear view of the previous pano you captured.
- Tripod direction - maintain the same tripod compass direction with each shot.
.png?width=688&height=577&name=TourBuilder%20Go%20Walkthrough%20-%20How%20to%20shoot%20your%20unit%20tour%20(1).png)
Step 4: Preview & Publish
After you have taken all of your 360 scenes, tap "Preview & Publish." At this stage, you can preview all the scenes you have taken throughout your virtual tour. When you are done capturing all of your 360 scenes, you can then add photos and/or videos to your virtual tour using your smartphone device. Once you are happy with your content, click "Publish Tour."
The publishing can take a few minutes, depending on how many photos you have taken. Keep the publishing screen on until it reaches 100%. Once a tour is finished, you will see it under the tours section within the app with a "Processing" indicator in the bottom right corner. Processing can take up to 72 hours, after which you will receive an email confirmation when your tour is available to view.
Once a tour is processed, it will appear on the app home page as "Published". The tour will also be available on the dashboard to view and share.
Watch the How-To Video: